Florida Lobstering


Hook up AC/DC Inverter to a Boat

Whether you want to hook up inexpensive lighting or a blender to mix your favorite frozen concoctions, AC power is often a great addition to a boat. Below you will find a description of how to mount an AC/DC inverter on your boat. Please note that when you are working with AC power you run the risk of electrical shock, and this is only amplified when working near water. Make sure that you read your AC/DC inverters instructions for proper instillation and grounding of the unit.
 
Tools and Materials:
 
Table Saw
Drill
Staple Gun
Tape Measure
Pencil
AC/DC Inverter
Marine Grade Plywood
Stainless Steel Screws
  - 5/8 inch screws to secure inverters to board
- 2.5 inch screws to secure board to frame rail.
Outdoor Capret
Red and Black Power Wire and Connectors
 
The first step is to find a location to install the inverter. You may want to choose the back of the boat where the batteries are stored. This worked out perfectly for my boat, as there is plenty of room to install the inverter there.


Since I own a pontoon boat, there is no fiberglass to bolt the inverter to.  What I decided to do was to use some marine grade plywood wrapped with outdoor carpeting that matched the boat.  Marine grade plywood makes a great foundation to mount electronics to, and the carpeting gives it a finished look. I sandwiched the wood between the metal rails of the battery area giving a flush installation.


I cut the plywood about 5/8 of an inch smaller than the area it was to be sandwiched in between. One opening was 12 x 42 inches, so I made the board 11 and 3/8 x 41 and 3/8 inches. This was to leave enough room so that the carpet could be wrapped around the wood and still fit between the rails. Once each of the boards was cut, I cut out a couple of 3 x 16 in strips of carpet. I wrapped the boards with the strips of carpet to test the fit. You want a snug fit, but you don't want to have to force the board in. You may need to trim the board a little more depending on the thickness of your carpet. 
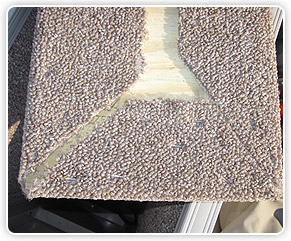
Next, I cut the carpet leaving about 4-5 inches of overhang on all sides. For the 12 x 42 inch board, I cut out a piece of carpet about 22 x 50 inches. It doesn't have to be perfect since it will be hidden. Once I had a piece of carpet that was about the right size, I cut a triangle off of each corner. This allows you to fold and staple the carpet without overlap. I used a standard home-use staple gun to secure the carpet to the plywood.


Once all of the pieces have been carpeted, it's a good idea to check again to make sure they all fit. Now that you are sure they will all fit, you should mock up exactly where you will install the inverters and wires. Once you are satisfied with the mock up, you can start to screw the inverters to the wood using 3/8 inch stainless steel screws. Make sure the inverters are screwed in tight but do not over tighten the screws, as this may strip the wood. Depending on location, you can either install the boards with the inverter already mounted or remove and remount once the boards are in their final location. Once the boards are installed you can drill a hole down through the frame rails to secure the boards into place. This may require up to a 2.5 inch screw depending on the thickness of the frame rails.
 
 
The last step is to hook up the wires and fire it up. Happy Blending!!!


How to Catch a Florida Lobster


  There are numerous ways and techniques to catch a Florida Spiny lobster. I will go over a few of the ways I do it. Before you attempt to catch a Florida lobster, you need to understand their behavior.
read more...